When disaster strikes, whether it’s weeks of empty grocery shelves, runaway inflation, or desperate looters prowling for supplies, the food you’ve stored can mean the difference between security and panic. But a pantry in plain sight is a beacon for trouble. A hidden root cellar under your garage floor keeps your provisions cool, dry, and invisible to everyone but you. Out of sight means out of danger, and when society gets shaky, that’s survival insurance.
We’ll go through everything you need to safely create one yourself, checking permits so you stay legal, reinforcing the structure so your garage doesn’t crack, adding waterproofing and ventilation to keep food fresh, and setting up smart shelving for long-term storage. Each technical step ties directly back to one goal: keeping your survival stash protected, hidden, and ready when the rest of the world runs out.
Why a Garage Root Cellar Beats a Backyard Pit
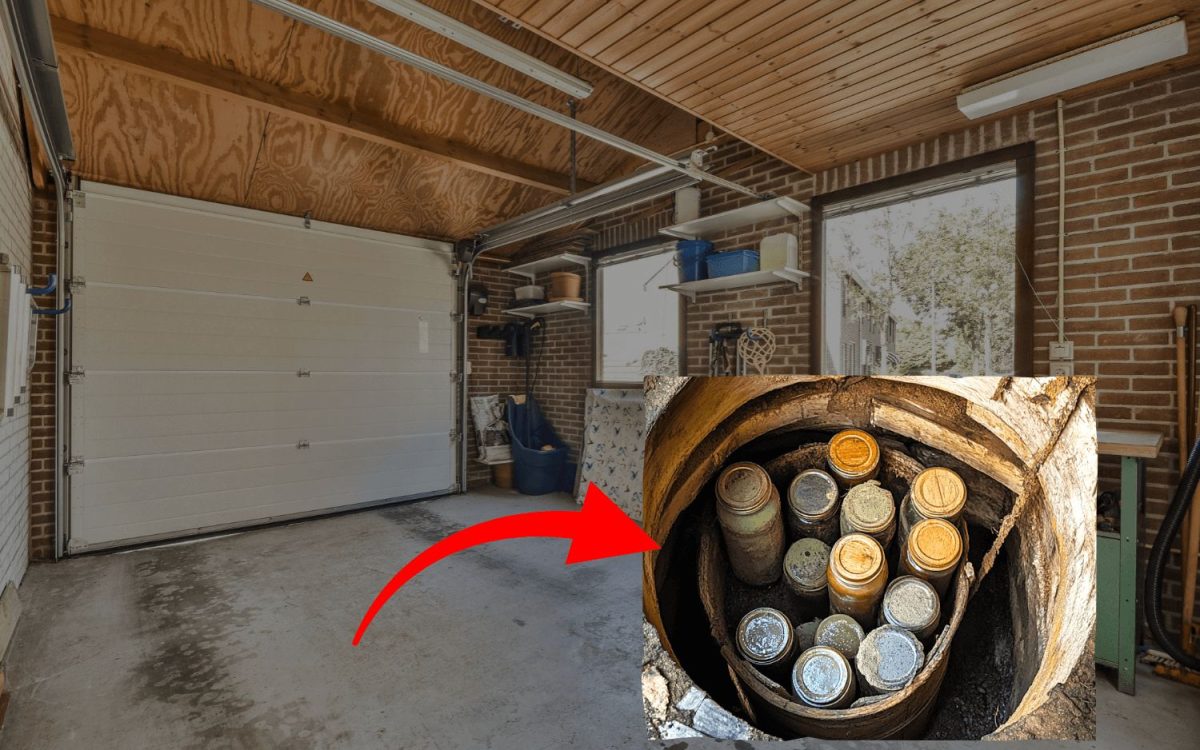
A garage root cellar gives you a level of security and stealth that an outdoor pit simply can’t match. Buried beneath a concrete slab, it’s invisible to neighbors, delivery drivers, and looters who might scour your property when shelves go bare. No mound of dirt, no wooden door, no suspicious vent pipe, just an ordinary garage floor hiding your lifeline. That means your emergency food stays safe and unseen when desperate people start searching for supplies.


It also offers superior weather protection and easy access year-round. The garage slab shields the cellar from scorching sun, driving rain, and sudden temperature swings that ruin stored goods. You won’t have to trek through snow or mud to reach your food, you can simply lift a discreet hatch and resupply without stepping outside. That keeps you dry, warm, and unnoticed while everyone else fights the storm or the crowd.
Compared to traditional backyard pits or even basement conversions, a hidden garage cellar is often more practical and far more discreet. Outdoor pits flood easily and freeze in harsh winters, while basement retrofits can be expensive and hard to hide. A well-planned garage floor root cellar combines the cool, stable conditions preppers need with the stealth and convenience that make your stash truly secure. You’re not just storing food, you’re protecting your independence when it matters most.
Read This First: Safety, Permits & Planning
Before you touch the slab, get these four things right:
- Check slab strength & load
Drill a small test hole or review plans to know the thickness (most are 4–6″). If unsure, call an engineer.
Keeps your garage safe to drive on and your stash safe from collapse.
- Pull permits & plan inspections
Local codes often require checks for foundation, waterproofing, and radon venting.
A bit of paperwork now keeps inspectors from shutting your project down later.
- Test soil & water table
Dig a pilot hole or hire a pro if water is likely. Plan drains and vapor barriers if soil stays wet.
Stops your hidden cache from flooding or molding while everyone else’s stockpile spoils.
- Budget time & money
You’ll need saws, rebar, waterproof membranes, and maybe pro help.
Planning resources now prevents half-finished holes when supply chains fail.
Site & Water Table Checks
Before you break ground, figure out what’s hiding under your garage floor. Start by measuring the slab thickness, most garages are 4–6 inches, but don’t assume. Drill a small test hole or check old blueprints if available. While you’re at it, learn what kind of soil you’re dealing with and how deep the groundwater sits. A quick way is to dig a pilot hole outside after heavy rain; if it fills with water, you may need extra drainage. In high-risk areas, a soil engineer can give you precise data. Knowing this now keeps you from cutting into a thin slab or digging into a wet, unstable mess that could ruin your project, and your survival stash.
Once you know the ground conditions, plan drainage and waterproofing before you dig. A perimeter drain with gravel backfill, a heavy vapor barrier, and exterior waterproof membranes will keep moisture out for decades. Skipping these steps is one of the most common root cellar failures, and nothing’s worse than finding your hard-earned food cache soaked and moldy when you need it most. A dry, sealed cellar means your supplies stay edible while everyone else’s pantries spoil.
Step-by-Step: Building Your Hidden Root Cellar
- Evaluate & Mark Your Garage Slab
Find out exactly how thick and strong your slab is before cutting. Drill a small test hole or review the home’s plans to check thickness, and identify any load-bearing walls or footings. If you’re unsure, call a structural engineer for a quick consult. This keeps your garage floor safe to drive on and protects your hidden room from collapse.
- Pull Permits & Prep the Area
Contact your local building office to see what’s required for underground work, many areas want inspections for drainage, waterproofing, and radon venting. Call utility companies to mark any buried lines. Inside the garage, clear vehicles, storage, and put up plastic sheeting to contain dust. Getting paperwork handled now avoids fines and keeps your survival build legal and secure.
- Cut and Remove a Slab Section
Outline the hatch and future room footprint. Use a diamond-blade saw to cut cleanly, then break out the section with a jackhammer or pry bars. Smooth edges will help when framing your hatch later. A clean cut keeps your floor strong and your secret entrance tight and discreet.
- Excavate & Shore Walls
Dig down to your target depth, usually 6–8 feet for cool, stable temperatures. In loose soil, shore or brace the sides to prevent cave-ins. Remove soil in manageable loads to avoid slab edge damage. A safe, well-shaped hole now means no cave-ins that could destroy your stash or injure you mid-project.
- Install Drainage & Vapor Barrier
Add 4–6 inches of gravel for drainage, install a perimeter drain pipe to daylight or a sump, and lay a heavy vapor barrier or dimple mat. This keeps groundwater from seeping in and ruining your food supply while everyone else battles damp basements.
- Build Walls & Ceiling
Construct walls with reinforced concrete block (CMU) or pour solid concrete with rebar. Plan a lid or ceiling slab thick enough to support vehicles above, sometimes thicker than what you cut out. Strong walls and roof mean your garage stays safe to park on while your secret cellar stays secure below.
- Install Ventilation
Run two PVC pipes: a low intake near the floor on one side and a high exhaust in the opposite upper corner. Three- to four-inch diameter works well. Include a capped radon vent stub from the gravel base to above the slab. Fresh air keeps your food cool and dry, while the radon stub lets you vent harmful gases later if needed.
- Waterproof & Insulate
Coat exterior walls with waterproofing membrane, add a drainage board, and insulate the ceiling with rigid foam. Cover insulation with an ignition barrier if local code requires. That keeps your supplies dry, cool, and safe from summer heat or winter freeze when the grid fails.
- Re-pour Slab & Install Hatch Frame
Form the hatch opening and pour the slab back flush with a load-rated steel frame. Choose a hatch that supports full vehicle weight and seals tight against moisture and pests. A strong, hidden door means you can park on it daily without giving away your survival stash.
- Finish Interior & Stock
Add sturdy shelving with airflow gaps, separate ethylene-producing produce like apples, and set up a thermometer/hygrometer to monitor conditions. Rotate food so the oldest is used first. That organization keeps your supplies fresh and ready when you need them most, no surprises during a crisis.
Ventilation & Climate Control
A well-built cellar lives or dies by its ventilation system. The most reliable setup is a simple two-vent convection design: run one low intake pipe near the floor in a cool corner and one high exhaust pipe in the opposite upper corner. Cool air flows in low, warm air rises and escapes high, creating natural circulation without electricity. Use 3–4″ PVC pipes with screens or rodent guards on the outside ends, and add caps or dampers so you can adjust airflow by season. That steady air exchange keeps your stash cool and fresh instead of turning into a stale, moldy vault.
Your goal is to hold a steady 32–40°F (0–4°C) with humidity between 85–95%, the sweet spot for roots, canned goods, and other long-term staples. Adjust airflow to match the weather, close vents slightly during warm spells, open them wide in winter, and add damp sand or sawdust if humidity drops. A cheap thermometer and hygrometer will let you dial it in without guesswork. Keeping this cool, moist balance means potatoes stay crisp, canned food lasts longer, and nothing spoils when the power’s out.
Finally, stay alert to radon and soil gases, which can seep into any underground space. Test your cellar once it’s enclosed, DIY kits are affordable and accurate. If levels are high, your two-vent system may help, but it’s smart to include a radon vent stub during construction: a capped vertical pipe running from the gravel base to above the slab. If needed later, you can add an inline fan to actively pull gases out. That foresight keeps your survival hideaway safe to breathe, even if unseen hazards lurk below.
Access & Concealment
Your entry point should be a flush, load-rated hatch strong enough to handle everyday garage life, cars, tool chests, and heavy storage. Look for reinforced steel or heavy composite doors set into a solid frame tied back into the slab. Many storm-shelter hatches are rated to hold several thousand pounds, which is ideal if you’ll keep parking over the spot. A tight seal also keeps out moisture, pests, and curious eyes. That strength means you can use your garage normally while a secret survival vault sits safely beneath your tires.
Once the hatch is secure, make it disappear in plain sight. The simplest trick is coating the entire garage floor, hatch included, with an epoxy finish so it blends perfectly. You can also cover it with heavy rubber mats, roll-out flooring, or a workbench. Some preppers go further and build a sliding storage rack or tool cabinet on top. If it just looks like an ordinary garage floor or workshop corner, no one will suspect there’s a fully stocked lifeline right below their feet.
Stocking & Layout
Think of your cellar as zones for survival efficiency. Keep root vegetables such as potatoes, carrots, and beets in the coolest, darkest corner on open shelves or ventilated bins. Canned goods and jars can sit higher up where it’s slightly drier and easier to grab. Drinks, from bottled water to home-canned juices, fit well along side walls or in crates. Leave room between each zone so air can circulate and temps stay even. That layout keeps your emergency supplies organized and easy to reach when every second counts.
Plan shelves with rotation and produce separation in mind. Store food so the oldest items are easiest to grab first, “first in, first out” keeps nothing wasted. Keep ethylene producers like apples and pears away from sensitive vegetables such as potatoes, or you’ll speed up spoilage. Build sturdy shelves with small gaps from the wall to encourage airflow and reduce condensation. That setup means fresh produce stays crisp and jars remain safe long after grocery stores go bare.
Common Mistakes to Avoid
Skipping permits and structural planning – Cutting into a slab without knowing its load capacity can cause cracks, sagging, or even collapse. Always verify thickness, reinforcements, and local building codes before you start. A few hours of planning now keeps your garage safe to park on and protects the stash you’re counting on when things go bad.
Poor waterproofing – Many DIY cellars fail because builders assume concrete alone keeps water out. Without perimeter drains, vapor barriers, and exterior membranes, moisture seeps in and turns food into mush. Proper waterproofing now means your emergency supplies stay dry and edible while neighbors deal with mold and ruin.

Inadequate ventilation – Skipping a two-vent system leaves your cellar damp and stale. Excess humidity and trapped gases can make produce rot and canned goods rust. Good airflow keeps your food fresh and safe when the power grid can’t help you.
Ignoring radon – This invisible gas builds up in underground spaces and can threaten long-term health. Test your cellar and add a fan to your pre-installed radon vent if needed. Breathing clean air ensures your safe haven doesn’t become a hidden hazard while you ride out a crisis.
Easier Alternatives if Your Slab Won’t Work
Not every garage is a safe candidate for cutting and digging. If your slab is thin, cracked, or sitting on unstable soil, consider building an attached shed or a basement extension instead. A small insulated outbuilding with a partially buried section can mimic a classic root cellar while avoiding the structural risks of cutting into concrete. Basement bump-outs or under-stair cold rooms are another low-risk option, you still get cool, secure storage without endangering your garage floor. That means you can stash supplies safely even if your existing slab isn’t strong enough to dig under.
Another solid option is a precast concrete tank or prefab storm shelter buried just outside the garage. These arrive engineered for soil pressure, waterproofing, and load, saving you guesswork and time. You can connect them with a short tunnel or simply keep the hatch right outside the garage for fast access. For practical, off-grid know-how on stocking and defending such spaces, check out guides like The Amish Ways or A Navy SEAL’s Bug-In Guide. Using proven shelter solutions keeps your prep secure while avoiding complex engineering under your garage.
You’ve seen how to plan safely, check permits, test soil and water, build strong walls, waterproof, ventilate, and stock a hidden root cellar under your garage floor. This isn’t just a weekend DIY project, it’s a strategic move to protect your family’s food supply when stores run empty or looters prowl. Start planning now while materials and help are still easy to find. Every step you take today, from proper drainage to smart food rotation, brings you closer to a secure, invisible stockpile. For deeper guidance on long-term food choices and survival storage tricks, grab Lost Superfoods or explore The Amish Ways. Turn this project from a cool idea into a reliable lifeline before the next crisis hits.